Do you find yourself frustrated with the default margins in Google Docs?
Luckily, it's easy to change the margins in Google Docs to better suit your needs. Whether you're working on a research paper, a business proposal, or a creative project, being able to customize your margins can make a big difference in the overall look and feel of your document.
So, how do you change the margins in Google Docs?
- Ultimate Guide To Za Warudo Everything You Need To Know
- Is Doom Metal Healing For Survivors Of Grooming
- Open the Google Docs document you want to edit.
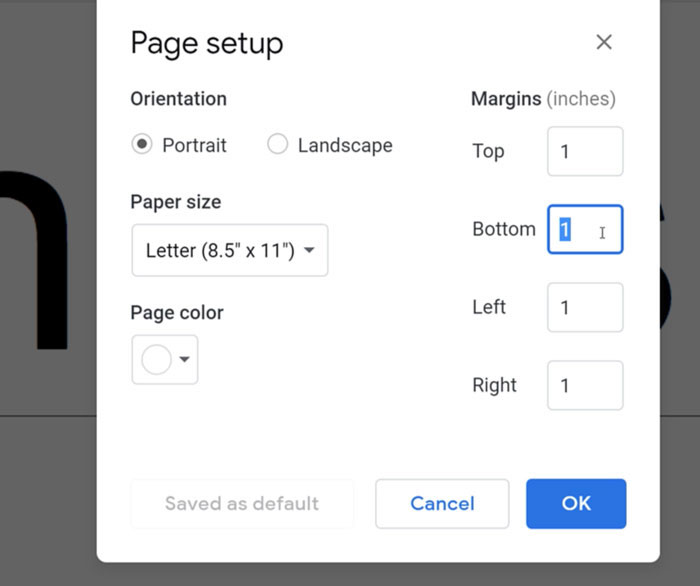
- Click on the "File" menu and select "Page setup".
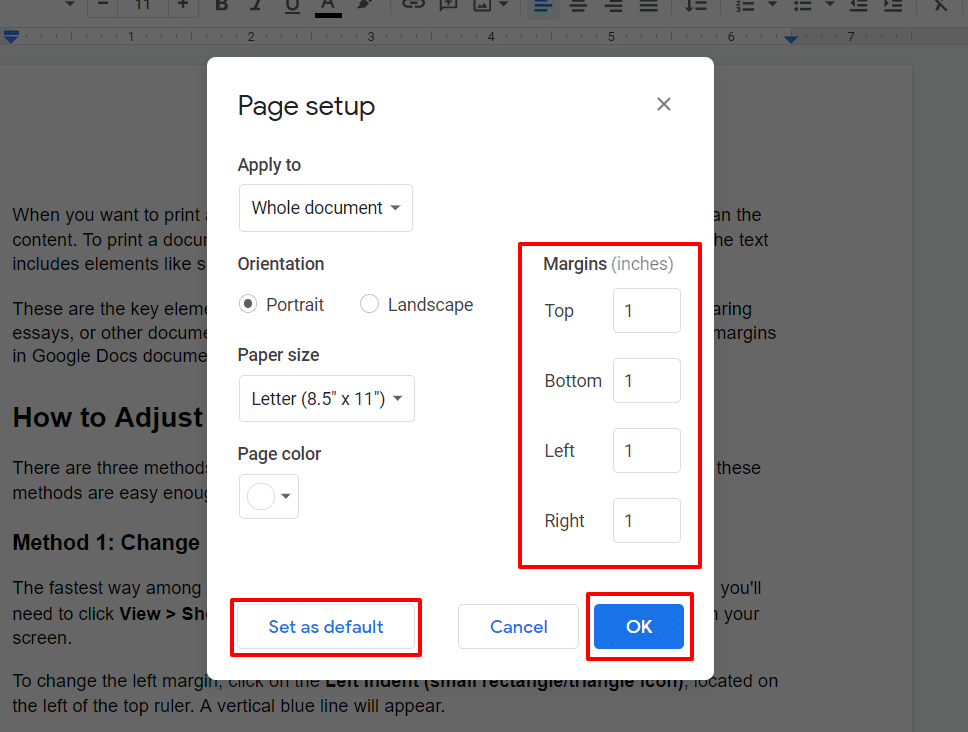
- In the "Page setup" dialog box, you can change the margins by entering new values in the "Margins" section.
- Click "OK" to save your changes.
Here are some additional tips for changing the margins in Google Docs:
- You can set different margins for different sections of your document by using the "Section breaks" feature.
- You can also use the "Ruler" to visually adjust the margins of your document.
- If you're not sure what margin settings to use, you can refer to the "Standard margin sizes" table in the "Page setup" dialog box.
Changing the margins in Google Docs is a quick and easy way to customize the look of your document. So, next time you're working on a document, don't be afraid to experiment with different margin settings to find the ones that work best for you.
How to Change Margin in Google Docs
Changing the margins in Google Docs is an essential skill for creating professional-looking documents. Here are seven key aspects to consider:
- Top margin: Controls the space from the top of the page to the first line of text.
- Bottom margin: Controls the space from the last line of text to the bottom of the page.
- Left margin: Controls the space from the left edge of the page to the text.
- Right margin: Controls the space from the right edge of the page to the text.
- Page orientation: Determines whether the page is in portrait or landscape mode.
- Page size: Specifies the physical size of the page, such as letter or A4.
- Section breaks: Allow you to set different margins for different sections of your document.
These aspects are all interconnected and work together to create the overall layout of your document. For example, increasing the top margin will move the text down the page, while decreasing the left margin will make the text wider. Experimenting with different margin settings can help you create a document that is both visually appealing and easy to read.
1. Top margin
The top margin is an important aspect of any document, as it affects the overall layout and readability. In Google Docs, you can easily change the top margin to suit your specific needs.
- Visual appeal: The top margin can be used to create a visually appealing document. For example, a larger top margin can make a document look more spacious and elegant, while a smaller top margin can make a document look more compact and efficient.
- Readability: The top margin can also affect the readability of a document. A large top margin can make it easier to read a document, as it provides more space between the text and the edge of the page. A small top margin, on the other hand, can make it more difficult to read a document, as the text may be too close to the edge of the page.
- Consistency: The top margin should be consistent throughout a document. This means that all pages in the document should have the same top margin. In Google Docs, you can use the "Apply to all" button in the "Page setup" dialog box to ensure that the same top margin is applied to all pages in your document.
By understanding the role of the top margin and how to change it in Google Docs, you can create documents that are both visually appealing and easy to read.
2. Bottom margin
The bottom margin is an important aspect of any document, as it affects the overall layout and readability. In Google Docs, you can easily change the bottom margin to suit your specific needs.
The bottom margin can be used to create a visually appealing document. For example, a larger bottom margin can make a document look more spacious and elegant, while a smaller bottom margin can make a document look more compact and efficient.
The bottom margin can also affect the readability of a document. A large bottom margin can make it easier to read a document, as it provides more space between the text and the edge of the page. A small bottom margin, on the other hand, can make it more difficult to read a document, as the text may be too close to the edge of the page.
The bottom margin should be consistent throughout a document. This means that all pages in the document should have the same bottom margin. In Google Docs, you can use the "Apply to all" button in the "Page setup" dialog box to ensure that the same bottom margin is applied to all pages in your document.
By understanding the role of the bottom margin and how to change it in Google Docs, you can create documents that are both visually appealing and easy to read.
3. Left margin
The left margin is an important aspect of any document, as it affects the overall layout and readability. In Google Docs, you can easily change the left margin to suit your specific needs.
The left margin can be used to create a visually appealing document. For example, a larger left margin can make a document look more spacious and elegant, while a smaller left margin can make a document look more compact and efficient.
The left margin can also affect the readability of a document. A large left margin can make it easier to read a document, as it provides more space between the text and the edge of the page. A small left margin, on the other hand, can make it more difficult to read a document, as the text may be too close to the edge of the page.
The left margin should be consistent throughout a document. This means that all pages in the document should have the same left margin. In Google Docs, you can use the "Apply to all" button in the "Page setup" dialog box to ensure that the same left margin is applied to all pages in your document.
By understanding the role of the left margin and how to change it in Google Docs, you can create documents that are both visually appealing and easy to read.
4. Right margin
The right margin is an important aspect of any document, as it affects the overall layout and readability. In Google Docs, you can easily change the right margin to suit your specific needs.
- Visual appeal: The right margin can be used to create a visually appealing document. For example, a larger right margin can make a document look more spacious and elegant, while a smaller right margin can make a document look more compact and efficient.
- Readability: The right margin can also affect the readability of a document. A large right margin can make it easier to read a document, as it provides more space between the text and the edge of the page. A small right margin, on the other hand, can make it more difficult to read a document, as the text may be too close to the edge of the page.
- Consistency: The right margin should be consistent throughout a document. This means that all pages in the document should have the same right margin. In Google Docs, you can use the "Apply to all" button in the "Page setup" dialog box to ensure that the same right margin is applied to all pages in your document.
By understanding the role of the right margin and how to change it in Google Docs, you can create documents that are both visually appealing and easy to read.
5. Page orientation
Page orientation is an important aspect of document formatting, and it can have a significant impact on the overall look and feel of your document. In Google Docs, you can choose between two page orientations: portrait and landscape.
- Portrait orientation: Portrait orientation is the default orientation for most documents. It is taller than it is wide, and it is typically used for documents that are meant to be read on a computer screen or printed on a standard sheet of paper.
- Landscape orientation: Landscape orientation is wider than it is tall, and it is typically used for documents that are meant to be printed on a large sheet of paper or viewed on a wide screen. Landscape orientation can be useful for documents that contain wide tables or images.
When choosing a page orientation for your document, it is important to consider the purpose of the document and the audience who will be reading it. For example, if you are creating a document that will be printed on a standard sheet of paper and mailed to clients, you will likely want to use portrait orientation. However, if you are creating a document that will be viewed on a wide screen, such as a presentation or a poster, you may want to use landscape orientation.
You can change the page orientation of your document in Google Docs by following these steps:
- Open the document you want to edit.
- Click on the "File" menu and select "Page setup".
- In the "Page setup" dialog box, select the desired page orientation from the "Orientation" drop-down menu.
- Click "OK" to save your changes.
By understanding the different page orientations available in Google Docs, you can choose the orientation that is best suited for your document and its intended audience.
6. Page size
Page size is closely related to margin settings in Google Docs. The page size determines the overall dimensions of the document, while the margins determine the amount of white space around the edges of the page. When changing the margins in Google Docs, it's important to consider the page size to ensure that the margins are appropriate for the document's intended use.
- Standard page sizes: Google Docs supports a variety of standard page sizes, including letter (8.5 x 11 inches), A4 (210 x 297 millimeters), and legal (8.5 x 14 inches). These page sizes are commonly used for documents that will be printed or shared electronically.
- Custom page sizes: In addition to standard page sizes, Google Docs also allows you to create custom page sizes. This can be useful for creating documents that have unique dimensions or that need to be printed on special paper sizes.
- Margin settings: The margins in Google Docs are measured in inches or centimeters. You can set different margins for the top, bottom, left, and right sides of the page. The margins can be adjusted to create a variety of effects, such as making the document look more spacious or formal.
By understanding the relationship between page size and margin settings, you can create documents that are both aesthetically pleasing and functional.
7. Section breaks
Section breaks are a powerful tool in Google Docs that allow you to create documents with complex layouts and formatting. By inserting section breaks, you can divide your document into multiple sections, each with its own unique margin settings.
- Use case: Creating a document with different page orientations
Section breaks can be used to create documents that have different page orientations. For example, you could create a document that has a portrait orientation for the first few pages and a landscape orientation for the remaining pages.
- Use case: Creating a document with different margin settings
Section breaks can also be used to create documents with different margin settings. For example, you could create a document with wide margins for the first page and narrow margins for the remaining pages.
- Use case: Creating a document with different headers and footers
Section breaks can also be used to create documents with different headers and footers. For example, you could create a document with a different header for the first page and a different footer for the remaining pages.
By understanding how to use section breaks, you can create complex and professional-looking documents in Google Docs. Here are the steps on how to insert a section break:
- Click on the "Insert" menu.
- Select "Break".
- Choose the type of section break you want to insert.
FAQs on Changing Margins in Google Docs
This section addresses frequently asked questions (FAQs) related to changing margins in Google Docs. It provides clear and concise answers to common concerns or misconceptions, helping users gain a deeper understanding of the process.
Question 1: Why is it important to change margins in Google Docs?
Answer: Changing margins allows you to customize the layout of your document, making it more visually appealing, readable, and suitable for various purposes. Proper margins enhance the overall presentation and readability of your content.
Question 2: Can I set different margins for different pages in my document?
Answer: Yes, you can use section breaks to divide your document into multiple sections, each with its own unique margin settings. This feature provides flexibility in creating complex layouts and accommodating specific requirements.
Question 3: What should I consider when setting margins?
Answer: When setting margins, consider factors such as document purpose, intended audience, readability, and any specific requirements or guidelines. Standard margin sizes are often recommended, but you may need to adjust them based on your needs.
Question 4: How do I ensure consistent margins throughout my document?
Answer: To maintain consistency in margins, select the "Apply to all" option in the "Page setup" dialog box. This ensures that the same margin settings are applied to all pages in your document.
Question 5: Can I change margins after inserting content into my document?
Answer: Yes, you can modify margins at any point during the editing process. Simply adjust the margin settings in the "Page setup" dialog box, and the changes will be applied to your existing content.
By understanding these FAQs, users can effectively utilize the margin settings in Google Docs to enhance the presentation and readability of their documents.
Key Takeaways:
- Changing margins is crucial for customizing document layout.
- Section breaks allow for different margins in various sections of a document.
- Consider document purpose and readability when setting margins.
- Use "Apply to all" for consistent margins.
- Margins can be adjusted after content insertion.
Transition to the Next Section:
The next section will explore advanced margin settings and techniques in Google Docs, enabling users to further enhance their document formatting skills.
Conclusion
Throughout this article, we have delved into the intricacies of changing margins in Google Docs, exploring its importance, functionality, and advanced techniques. By understanding the concepts of page orientation, page size, and section breaks, you are now equipped to create professional-looking documents that meet your specific requirements.
Remember, margin settings are not merely cosmetic adjustments but powerful tools that enhance the readability, visual appeal, and organization of your content. By mastering these settings, you can effectively communicate your ideas, captivate your audience, and make a lasting impression through your written work.
![How to Change All Margins in Google Docs [FAQ]](https://lh6.googleusercontent.com/ExTZ3MQn28pfm1e4KgZFKyi4Iq62DPkDLL7F5ys8V4ClU7ssuQGnodKSXA_CYRBJHYRQpLYYk8M3xXzA9VtFnxsEVmOk2KVjwzK2QcIiEp2SI6mD8nAPW_j21cb9j5OJZJqu7ok7)